Saturday 22 December 2012

A photo update

This is the baffle being inserted with the gentle persuasion of a steel mallet.
I tapped it through an off-cut of MDF so that there wouldn't be any dents.

If I ever drop anything into the drying cabinet, I'm going to need to get it out again.
My hands can't fit in those holes:

But they can fit in this one.

The tape was originally to make sure that only the desk was painted in waterproof enamel oil paint, but I thought 'let's paint the whole thing again!' so it was removed and everywhere is now waterproof.


I also found some lightproof cloth that is very thin and extremely opaque! And only $7 a meter!
I bought 0.5 meters of it to test before buying the 11m or so I need. Now we turn into a stitching blog!


Friday 21 December 2012

and now!

It's been several weeks since my last update. However, there has been considerable progress in that time.

First off, the essential painting is done. DONE! The inside is now completely smothered in an oil-based enamel that is so water resistant spills just bead up on its surface. After fretting about the sponge-like qualities of MDF and water, this is an absolute joy. for me, at least.
Later on, I might get some more paint and work on the inside of it. For now though, there are other priorities.

The biggest of those is to get the darkroom dark. This is accomplished by a lightproof cloth/material draped about the entrance. It'd be easier to explain with photos, however my camera is somewhere else and I can't be bothered to get it and take snapshots that embarras my photographic ego in terms of their horrendousness.
Every cloth I've tested so far (by putting the flashlight of by iphone on one side of the fabric and looking through) has had pinholes of light coming through, which in unacceptable, especially when compared with the impeccable opacity of my changing bag. Which I hate. An idea I've had is to get some black plastic from a gardening shop and use that. It should work quite well, however rips could be an issue.

Back soon. I've ordered colour film developing chemicals and equipment, too.

Wednesday 28 November 2012

Undercoating almost complete

And so the most frustrating part of the project continues. Painting.

When I first had the 'dry fit', putting the modules together to see if they fit, they did. Oh, they fit well - to within a fraction of a millimetre.
I then needed to undercoat the thing, and I decided to do it in modules (i.e. disassembled) so I could get at the more fiddly areas. Well, that was a mistake.
When I tried to reassemble it, it didn't fit as well as I would have liked. I had to sand and scrape away layers of paint and MDF to get some things in, like this


It worked in the end, but I should have just assembled it fully, and then painted it.

Anyway, other things were happening too, such as preparing to drill the air-out vent hole

Old cheap russian gas mask + HEPA filter = win

This is one of the two fans I'm going to use.

And the door! It works!

This is part of the baffle for the air-out vent

With the air-out vent (last two photos) the bit on the table is put in the thing above the door (the drying cabinet, where film hangs up to dry in the airstream). However, paint has made it a tight fit, meaning that it's almost certainly a one-installation job, with no ability to remove and fix it. That means that I'm going to need to undercoat it, and then paint it black where it is now, then install it.

Also, I haven't got a photo of it, but the air in module has an issue: It's stuck. I undercoated it and screwed it in place, however the undercoat is a bit sticky. Thus, its stuck and wont come down, which means I'm going to have to deal with two issues: 1. Painting the inside black to minimise reflections of light; and 2. Putting the fan inside it.

For 1: Solved. Because it has airflow through it, and because its undercoated, I can just spray black spraypaint through it, and the whole thing should end up black on the inside.

For 2: Solved. Instead of having the fan on the inside, it's going to be mounted on the outside, with the air HEPA filter on top of the fan - it's a fan sandwich. I've played around with them, and it will work. It might look a bit odd, though; but I'll paint it black on the outside so it looks less conspicuous. I'm actually thinking of painting the whole thing black on it's outside, so it looks a bit more subtle. If possible. It's not exactly going to look pretty on the outside, I've recently realised (especially when the dark cloth thing folds up as the door closes), so why not go with the flow?

More to come soon. It's going to be complete within several weeks.

Tuesday 13 November 2012

Painting

After the dry-fit, I needed to disassemble the modules in order to paint them.
It's pretty slow, and I'm strongly regretting using a brush. Now I have somewhat annoying brushstrokes on the desk; but it's unlikely that the desk will be often clean enough to 'appreciate' it. 


This is the air-in module. It's attached to the top corner of the darkroom so that three walls come up against it and provide a light-tight seal. The panel things are so that air can get through, but light cant. It's currently smothered in undercoat.

This is at the base of the drying cabinet, taken from what will become the inside. There's going to be an air filter of the size of the box on the other side, and the holes were drilled to let this filtered air through; sucked up by the air-out module.

Poirot and the mystery of the brushstroked desk? 

Here, we have the first door attached and working! It was so easy, simply lining up the hinge and screwing it in while on the floor. 

The door working with the negative shadow (?) of the light coming through the air-out vent hole

Saturday 3 November 2012

Progress

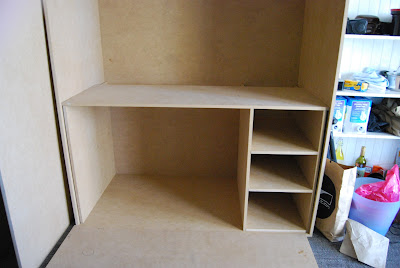
Now the left under-desk thing is done too:


Here it is with the top on. The top is made from two pieces of MDF, so that there'd be a hole for the film to hang through in the drying cabinet.


Designing the drying cabinet (and making sure it fit) was one of the more difficult things about this build, and would have almost been impossible without being able to design it with a computer.
The black rectangle down the bottom is where holes and a HEPA air filter are going, so filtered dust-free airflow can travel up the cabinet to dry the films faster. Conveniently, this is also works as an air-circulation thing for the darkroom in general; with another HEPA filter over a fan for air intake in the top right corner of the shell, and this as the air outlet, which is then sucked out by another fan at the top of the cabinet.


Here I'm working out the ideal shelf heights. I'm planning to store chemicals in used wine bottles such as this, and since the height of the shelves is not critical in regards to the computer design and MDF boards, I'm adjusting it for this.


The set up as it currently stands

Friday 2 November 2012

Contruction begins

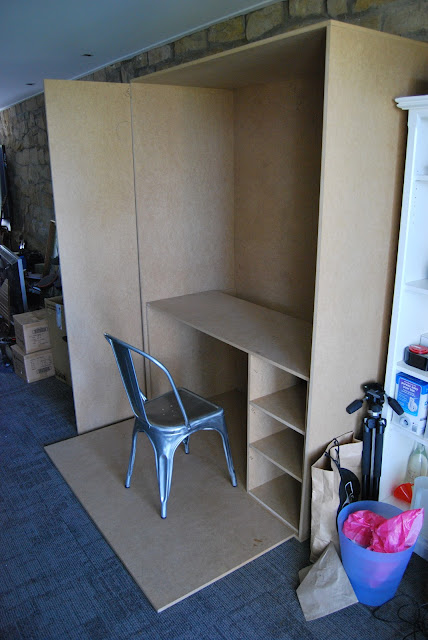
The first thing I did was to build the 'outer shell' of the cupboard. It's the heaviest section, taking all of the huge, heavy panels (expect the doors at this stage). That was pretty easy.
If I ever need to disassemble the darkroom, this shell is not coming apart. Glued, and then predrilled-and-screwed it's very solid.

After a while, I made a second section: the shelf thing under the desk on the right hand side. Perhaps one day I'll make it into the drawer unit it was designed to be; but I thought having drawers wasn't essential at this point. Here, I've thrown the bench panel on top just for fun, and put both in the shell:

ITS LOOKING SOO GOOOD!
At this point, I'm starting to realise that it actually might work out.

Tuesday 10 July 2012

The wood arrived

today! I love progress, especially when you can see it :p


I've been labeling each piece with its' dimensions (and an alphabetical letter) to help determine which piece goes where according to my sketchup design.
I also got lots of offcuts to play with, which will doubtless come in handy for the little extra bits I might make, such as a light box and an open-door lock.

Overall, the cost of this wood was about $300. Plywood was 2.5 times the cost, and it had warpage.
Not the characteristics one looks for when trying to make an accurately designed thing.

Although the MDF was heavier and has a tendency to expand on contact with water (which I'm going to adress by drowning it in 'outdoor' paint), it's the best compromise.

More to come soon!


Tuesday 3 July 2012

AND SO I SAID

to myself, 'It's time to order some film'.

It was done, and a week later, it arrived.

Camera food

I've never really done an order like this before; I've never used any of these films (or any E6) before either. And I don't even have a decent 120 camera, instead a 2.25" x 3.25" Pressman C that I intend to use with this film after it's been cut up.

Velvia!

Portia!

Efke!

Fujichrome!

The fun begins!

Monday 2 July 2012

SINCE THE BEGINNING

considerable progress has been made. I alluded to how the darkroom was to be in our old cellar, but the discovery of small asbestos panels on the floor; filling the gap between the wooden floorboards and the concrete tiles put me off.
Well, actually it was more the asbestos that wasn't there - the 10cc or so that had been crushed into dust through 60 years of neglect, and which now resided in the dust that I was in the process of vacuuming up.


Oh well. Time to design / plan another darkroom!

Recently, I've been having a spate of minimalistic thoughts. About how things should be small, concise,  effective and portable.
Essentially, this means that things should be able to be removed and taken away with relatively short notice - and set up again within a short time. i.e. not bolted to walls, not heavy and inefficient - and not cluttered.
Perhaps this is linked to how I'm going to move out of my parents' house in a couple of years, and how I'd want to bring my stuff with me.

Anyway, it kind of led me to think about a 'cupboard darkroom' when I was designing the cellar one. I thought 'Wouldn't it be cool to have a super space efficient darkroom that just folded up?'.
I subconsciously added it to the list of 'things to do one day'. That paradoxical list that ensures it will never become anything more than a cool idea.

However, 'that day' came when I discovered the asbestos. I knew that any more work in that room was postponed indefinitely; and after a period of annoyance about how all the efforts toward that room were wasted, I realised that this was a perfect opportunity for me to build the cupboard darkroom.

Cupboard Darkroom: Essentially, it's a cupboard. And yet, also a darkroom. [woah!] When the doors open fully, they lock in place somehow; and in the space between the doors is an opaque cloth (ideally one that would pop up automatically when the doors open, a bit like how the bellows' on an old camera extends automatically when its' unfolded). Also  in this cloth is a porthole; a lightproof, collapsable door using magnets or velcro through which one can clamber through - with style.
Inside will be a desk and shelves, and it should be a highly versatile space. I'm thinking harry-potter's-cupboard-under-the-stairs crossed with lots of this crossed with a messy artist's studio.

I began, I think, about a 1.5 months ago. Experience has told me that you get ideas more often when your out doing things than when you're inside, writing blogs. Such that T-shirt silkscreening business idea I got while working at my part time job. More on that later.

I went to a secondhand shop that I knew would have a number of cupboards available; and this was the only contender that was even remotely suitable:
If this is to be a photography blog, I'd need to get a lot better. quick.


The issue being that my innate [and yet perpetually starved, but still fussy] perfectionist soul was not satisfied. This cupboard - and all the others there - was quite simply not right. The general layout, size, etc were all wrong! At the time of writing, I can't really recall what these were, but I knew, from that point on, that I had to do something.

I had to build it myself.


And so the design process began. Learning from my experience building valve amps (such as a variant of the headphone amp detailed here), planning and design can easily take up most of the time of making  things. Although that's with the ideology that it will never be completely finished; always evolving.

Anyway. Darkroom. Yes, I began to design shortly after visiting that shop, using sketchup. I haven't ever used it before for anything major or complex, but it is an amazingly capable sketching tool.
Several weeks of adjustments, modifications, etc, later and now I have a final design:
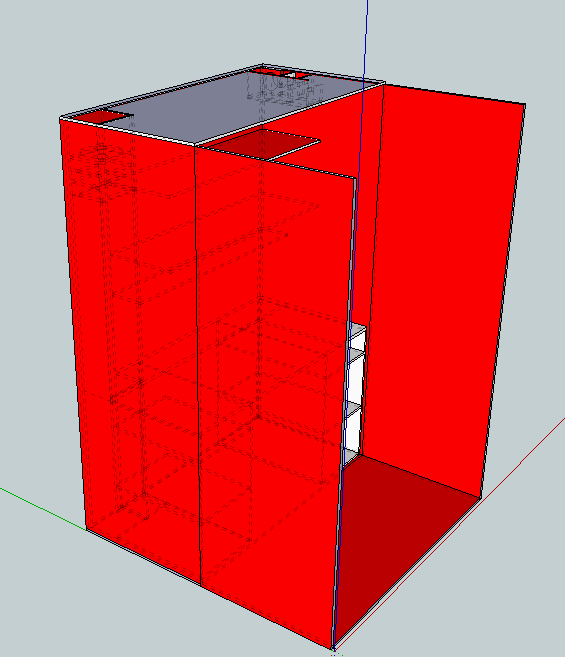


It's 2 meters high, 1.4 meters wide and deep.


Notes:
The holes at the top are little glitches I didn't repair. The design here exists only so I can get a list of wood parts to order precut in MDF.

The panel on the floor between the doors is a floorboard. wow! my very own floorboard!. It exists because the room it's going in has carpet on the floor, and I'd rather keep this cupboard as dust-free as possible. The board exists to act as a floor above the carpet-dust. It also helps with ensuring the light-tightness of the room.

The funny thing on the left side: The drying cabinet / out air vent. It's tall enough that I can dry 220 film  hanging lengthwise; and also large enough to hold prints of 5" x 7". It has a light trap on the top.

The top-right-corner thing: The air in vent, plus a light trap.

So yeah.

I'm in the process of ordering the wood - so more updates on the construction of it soon.

Anyway, the darkroom. As you can see, it is both rather small and yet reasonably large. It's big enough for what I want to do, which is to mainly process film; including B&W, C-41 and E6. I've been thinking about enlargers and prints, and I've designed the maximum size my darkroom can handle (or fit in the drying cabinet) is 5" x 7" - If I want anything bigger I can just scan it. My local stationary supplier (Officeworks) can make A0 prints in colour for $25 and B&W for $5. Enough said.


Anyway, further updates to come within the week.

Tuesday 24 April 2012

And so-

It begins.

The blog. Not really too much to mention, except that there will be a series of blogs on how I transform our cellar (some say it's a spider breeding ground) into a darkroom.
'Should be fun.